How to Stabilize Shaky Footage in DaVinci Resolve 17

Hey Video Editors!
Want to stabilize your shaky video but didn’t find any proven way after doing a lot of research?
Worry not!
In this guide, we are going to share two super easy ways to stabilize shaky videos in DaVinci Resolve 17 that allow you to give a professional look to your footage.
Let’s start! But, before that let’s have a quick look at what the new version of DaVinci Resolve brings for pro video editors?
Well, DaVinci Resolve 17 is the world’s top video editing solution with over 100 new exciting features and 200 improvements! It combines the color page features, redesigned primary controls, new HDR grading tools, AI-based magic masks, and much more. Apart from this, there are lots of new plugins for DaVinci resolve available online. Video professionals can also use these plugins to create stunning visual effects.
Now, let’s move on to the main agenda of this writing….
Stabilize Shaky Video In DaVinci Resolve 17 – Two Proven Methods!
The below-mentioned two methods are the accurate solution to stabilize shaky videos effortlessly.
Proven Method No.1– Stabilize Shaky Video Footages in the Edit Tab.
Proven Method No.2– Stabilize Shaky Video Footages in the Color Tab.
Let’s throw a spotlight on both of the ways turn by turn.
Have a look!
Method 1- Stabilize Shaky Video Footages in the Edit Tab.
- Open DaVinci Resolve 17 Software -> Import the video inside your project
- Click on the “Edit” tab.
- Drag the video inside the timeline and select it.
- Now search for the Inspector icon at the screen’s top-right corner.
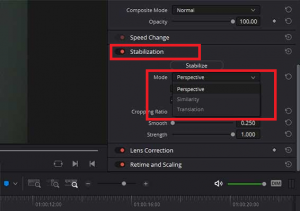
- Once you find the icon, click on that and scroll down to the “Stabilization” section.
- Here, you will find the three stabilization modes
- Perspective
- Similarity and
- Translation

- Simply select the mode you want to work with and hit the “Stabilize” option.
- If the result is not upto your expectations, try different settings repeatedly until you get it right.
Three Stabilization Modes
1. Perspective: This mode is similar to the warp stabilizer in Adobe Premiere Pro. Here, you will get a lot more flexibility with stabilizing footage in post-production.
2. Similarity: This mode is used to apply pan, tilt, zoom, and rotation analysis.
3. Translation: Opposite to the “Similarity” mode, Translation mode is used to apply pan and tilt analysis only. This mode is works with the X and Y axis to stabilize videos.

Along with three stabilization modes, there are some other modes that allow you to give a smooth finishing to your shaky videos.
As you saw in the above screenshot, there are 5 additional modes. Let’s have a look at each of them:
Starting with:
- Camera Lock: If you want to eliminate all the movements in a video, then this tripod stabilization mode is useful.
- Zoom: If you want to eliminate all the black bars on the edge that may appear when the footage become stable, in that case, don’t forget to use the “Zoom” mode.
- Cropping Ratio: It is another mode in DaVinci Resolve 17 that allows you to crop the image as per your requirement. The higher the number, the more the image can be cropped.
- Smooth: If you don’t want to remove all the movements from the shot, then the smooth mode is used. It is used to determine the smoothness of the camera moves.
Strength: Last is strength, it is useful in determining the strength of the stabilization. By default, it is set to 1.
- Value 1 is the maximum;
- The value 0 is the lowest;
- Value -1 is the opposite of value 1; it will create more movement.
Method 2- Stabilize Shaky Video Footage in the Color Tab.
I hope that you get the results that you expect with the first proven method discussed above. But, if you do not feel lucky with that, then try this second method i.e.,
Stabilization of shaky videos by using color tab.
So, let’s start!
- Move the cursor to the middle section and choose the “Tracker” tool -> Go to Window -> Stabilizer.
- Here, at the bottom, you will find the same five options as in the Edit tab (Camera Lock, Cropping Ratio, Strength, Smooth and Zoom).
- Simply, go to the drop-down menu and select Similarity.
- Press the “Stabilize” button.
- A pop-up window will appear to show progress.
- This is the beauty of having different stabilization modes, if one doesn’t work, you can use another one to get the desired effect.
One plus point of using different modes is that it allows you to change settings until you achieve the desired effects that you’re looking for.
Wrapping Up!
Following all the above-mentioned methods in DaVinci Resolve transitions allows you to stabilize your videos in no time at all!
Stay tuned for all the latest updates on this amazing video editing software!!!


